

How To Open Windows Repair
How to repair Windows 10 (and eleven) in iv steps
When Windows ten gets wonky, try this serial of repair techniques — in this club — to effort to ready things right.

Show More
Sometimes a Windows ten system starts misbehaving to the point where repair is needed. This often takes the course of worsening operation or stability, and can originate from damage to, loss of, or abuse of Windows system files typically found in theC:\Windows folder bureaucracy. When that happens, users would be well advised to intermission out the post-obit routine to help them gear up things back to rights.
I initially wrote this story in 2022, but as Windows 10 has evolved over fourth dimension, some of the steps accept changed a bit. I've now updated information technology for the latest versions of Windows 10. That said, most of these approaches also work with Windows vii and viii (with slight variations), and the advice here applies almost identically to Windows 11, which Microsoft is gradually rolling out to Windows 10 users whose hardware tin can support the new Bone via Windows Update from October 2022 into early on 2022.
The Windows x (or 11) repair drill
The idea is to first try the initial step in the sequence. If that doesn't fix what'southward broken, accelerate to the next footstep. Continue working through the steps in order until yous achieve the stop, and you are spring to fix the vast majority of problems. (The merely remaining stride at that bespeak would exist to supersede the organisation on which the software is running, and that's outside the telescopic of this story.)
The amount of time and effort required for each step goes upwards incrementally. Some steps involve additional piece of work to restore the prior country of your PC more or less back to where it was prior to taking that step. Thus, the nigh important flake of advice I tin dispense for those who must venture beyond Stride 1 is this: Make a consummate backup of your system to provide a source for files and data that might otherwise go missing. Ignore this advice at your own run a risk.
Stride 1: Using DISM and SFC for organisation repair
Since I wrote the original version of this story, I've obtained directly advice from Microsoft that it's best to run DISM before running the System File Checker, a.k.a. SFC. Hence, I am reversing the order of events for this step. I'll echo Microsoft and say "Always run DISM beginning, and then SFC second, not vice versa."
DISM is the Deployment Image Servicing and Management tool. Information technology's a kind of Swiss Regular army knife for working with Windows operating system images, both offline and online. DISM can often set up things that SFC can detect but that it cannot itself set up. DISM supports a raft of capabilities with switches and parameters to match, but basic system file repair syntax is reasonably like shooting fish in a barrel (though it often requires multiple passes earlier it can set up things direct).
You lot must run DISM in an Ambassador: Command Prompt window (press the Windows primal + 10 combination and select Command Prompt (Admin) from the resulting popular-upward carte) or in an Administrative PowerShell or Windows Terminal session. Hither's some sample syntax (consult the TechNet DISM Technical Reference for all the gory details):
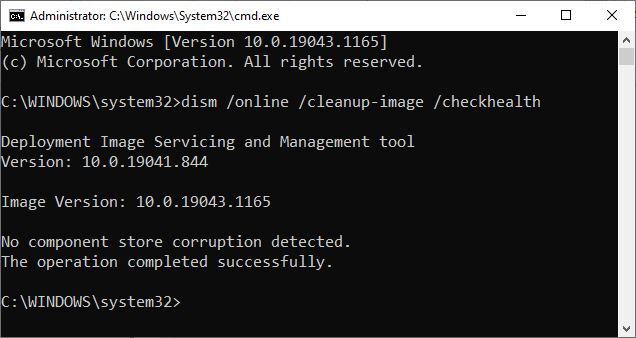
dism /online /cleanup-image /checkhealth
Almost of the time when you run this command, the output will find nothing amiss, as shown in Effigy i:
 IDG
IDG Effigy 1: DISM can check the wellness of any Windows image. Hither, it reports all is well on a product PC.
The /checkhealth control only checks the running image (that's what /online tells it to do) to come across if it can detect any damage or corruption. Because it'due south only checking file hashes and signatures, this control completes in under one minute on most machines. The good thing most /checkhealth is that it not but tells you if information technology finds damage but if that harm is repairable or non-repairable. If it's repairable, you lot tin proceed to the /restorehealth option (covered in the following paragraphs); if it's non-repairable, jump to Footstep 2.
If DISM reports that component store corruption is constitute and is repairable, you should endeavor repairs. That syntax reads:
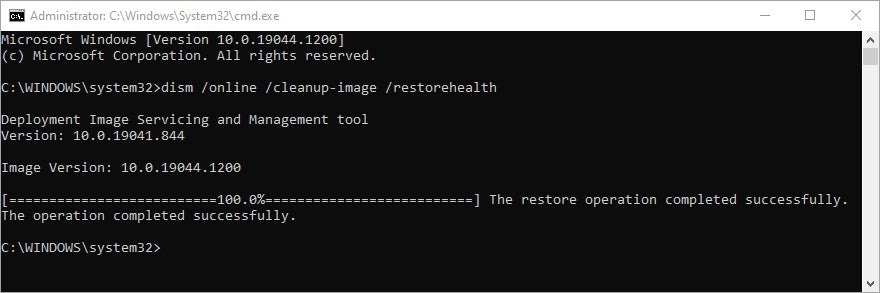
dism /online /cleanup-paradigm /restorehealth
Even if errors were detected in the preceding stride, this command should complete successfully. It replaces corrupt or questionable elements in the Windows Side-by-Side (WinSxS) store, reading from a local copy of your Windows image files.
The/restorehealth command can be catchy to use. Because it can really repair a Windows image, information technology needs a source from which to attempt such repairs. You can omit the/source option, merely if y'all do, the control will effort to catch its files from Windows Update over the cyberspace. This may or may not work, depending on firewall settings on your network.
A safer bet is to point DISM at a known good source for Windows prototype components on the local automobile (or on your local network). This can be a Windows image (.wim) file or a compressed Windows image (.esd, which is used for electronic software downloads of Windows installations, as the file extension is meant to communicate). You can also point to a dissever re-create of aWinSXS binder (the usual directory path is C:\Windows\WinSXS) taken from another PC with similar or identical hardware for whichdism ... /checkhealth returns a clean bill of health.
The syntax for prototype files is where things can get interesting. To bespeak to theinstall.wim file that shows up in ISO downloads for the Windows x installer on a USB flash drive designatedL:, for instance, you must apply the following source specification (which uses the first image it finds inside the .wim file, designated :i):
/source:WIM:L:\sources\install.wim:1
To employ an ESD file, alter the wim items to esd, as shown here:
/source:ESD:L:\sources\install.esd:one
If you see difficulties getting this to work, effort adding the/limitaccess switch to your command strings. This stops DISM from attempting to grab source files from Windows Update, which information technology will sometimes practise fifty-fifty if pointed at a local source. If you merely can't get either of these to work, endeavour aWinSXS folder instead.
Notation: the version and language for the/source image must be identical to that for the image to be repaired. This may hateful using HeiDoc.internet, UUP Dump, or Microsoft's Media Creation Tool to catch the right Windows 10 or 11 version/build (come across my article "The best places to observe Windows 10 ISOs" for details on how to use these sources) and creating media or mounting the ISO file to requite DISM the right/source from which to work. For Windows 11, check the Windows Insider Preview Downloads folio to grab the proper ISO.
Figure 2 shows typical DISM output using /restorehealth:
 IDG
IDG Figure 2: Fifty-fifty when DISM /checkhealth finds errors, the /restorehealth pick is usually successful. (Click image to enlarge it.)
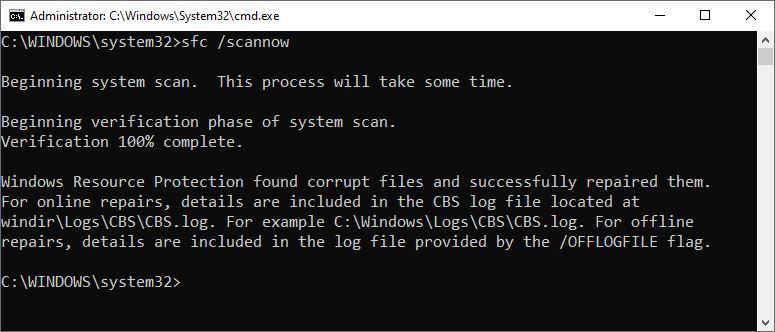
Next, it's time to run SFC, Microsoft's System File Checker. To quote TechNet, the organisation file checker "scans and verifies versions of all protected system files." Information technology can tell you if information technology finds annihilation awry if you enter SFC /scannow at the command line.
As with DISM, y'all must run SFC from an Administrator: Command Prompt or an Administrative PowerShell or Windows Terminal session. This control takes 5 to 10 minutes to complete, depending on your PC hardware. Dissimilar DISM, SFC scans and initiates repairs inside a unmarried control.
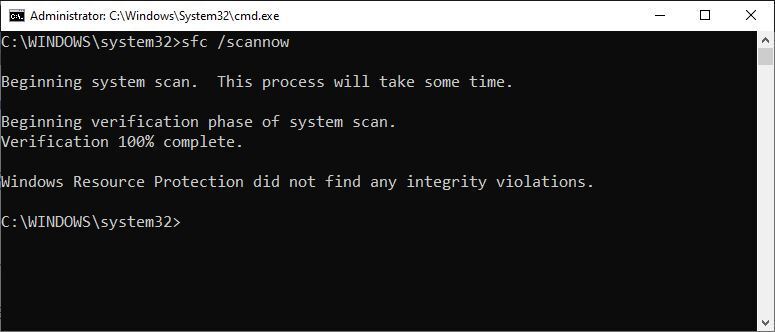
Figure iii shows sample output when SFC finds files in need of repair. If this occurs on your PC, echo the /scannow command until it gives the articulate bill of health shown in Figure 4.
 IDG
IDG Effigy three: If SFC finds questionable files, information technology will repair them if it can. Here, it succeeds. (Click prototype to enlarge it.)
 IDG
IDG Figure 4: Eventually, SFC volition report finding no "integrity violations." You lot're washed! (Click image to enlarge it.)
In my experience, 80% of all bug will exist solved at this signal, so the odds are in your favor that you won't have to go on going. Only if DISM tin't fix your Windows image, or SFC can't or won't make repairs to your organization files, proceed to Step two.
Step 2: Try a recent restore indicate or image backup
A restore point is a snapshot of a Windows PC's OS country from a specific point in time. If enabled, the Windows Organization Restore capability can create and maintain restore points on your behalf. To see if this is an choice on your target machine, type restore point into the Windows 10 search box. The System Properties window should open to the System Protection tab, shown in Figure 5.
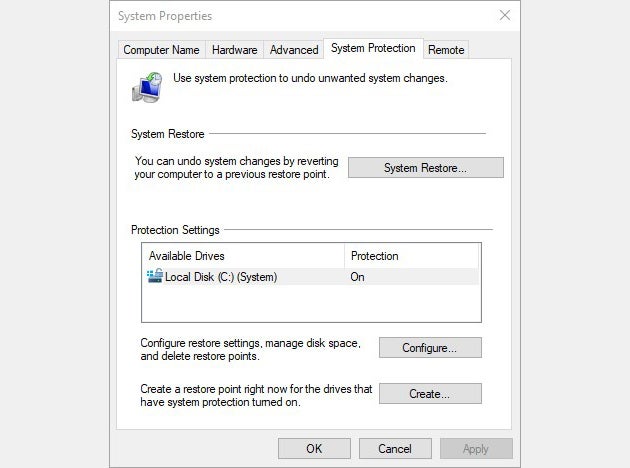 IDG
IDG Figure 5: Admission available restore points using the "Organization Restore…" push.
To look at restore points, yous must piece of work through the System Restore wizard. Click the System Restore... button to launch the wizard, so click the Adjacent button on the beginning pane of the wizard to meet a list of restore points bachelor to you. (If y'all don't similar what you encounter, or you don't see something from before your troubles started on this machine, click the Bear witness more restore points checkbox for a complete list of what's available to you.) Click the restore point to which you would similar to revert.
Figure 6 shows the lone restore point bachelor on my test PC.
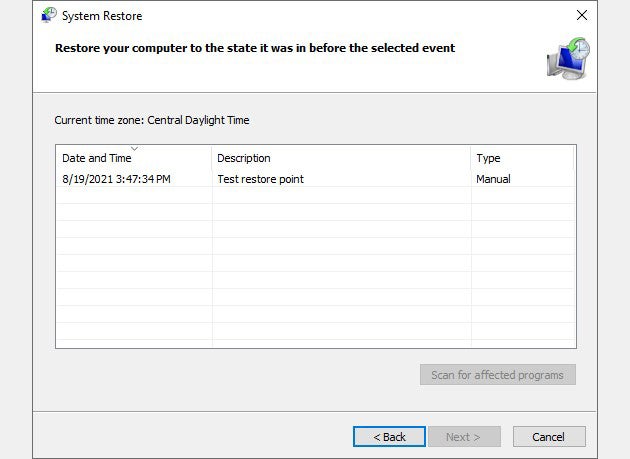 IDG
IDG Figure six: For this story, I created a restore point named "Test restore point."
Considering I take only ane restore point — I don't use them much whatsoever more, for reasons I'll explain coming upward — I picked that item to show you lot what appears when you select a restore betoken in this utility. If you click the Scan for affected programs push button it will tell you if any programs or drivers will be afflicted by rolling back to the restore bespeak you lot've selected. In this case, there'south no touch, as shown in Figure 7. If something were to be affected, it would show upward in either the top or bottom list in that results pane.
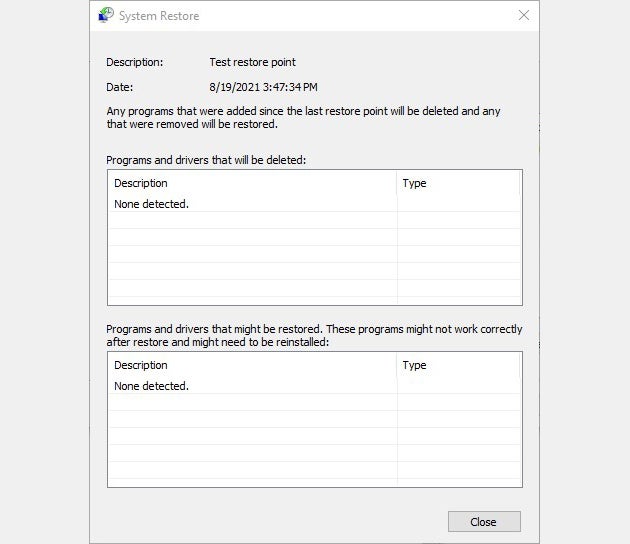 IDG
IDG Figure seven: The current restore point has no affect. But older restore points will provide a listing of drivers and programs that need to be reinstalled if you revert to that restore point.
Information technology usually takes between 5 and 15 minutes to revert to a restore point. The amount of additional effort to catch back up to where you left off depends on the number of items that demand to be installed or updated, as shown in Effigy vii. This can have from minutes to an hour or more depending on size and scope.
All this said, I don't use Restore Points anymore. I've run into occasional bug with failed restores, and I've seen plenty of discussion in Microsoft Community and TenForums amongst other users who've had similar problems. My preference is to restore an image built using Macrium Reflect (free or commercial; I use both). It's faster than System Restore, and I've never been unable to restore a valid, integrity-checked Reflect fill-in. You make up one's mind what's all-time for you; I use Reflect.
Restoring an paradigm backup is much similar reverting to a restore signal: cull the image (usually by date and time) to which y'all'd like to scroll back, and then initiate the restore procedure. For case, Macrium Reflect offers a "Restore" carte du jour, and so allows you to browse stored fill-in files to pick the one you want in an Explorer-based Open window.
If reverting to a restore bespeak or image fill-in doesn't work (or you don't have either of these), it's time to motility on to Step 3.

Source: https://www.computerworld.com/article/3080839/repair-windows-10-and-11-step-by-step-guide.html
Posted by: brandtroat1936.blogspot.com
0 Response to "How To Open Windows Repair"
Post a Comment